|
|
Welcome to the High-Speed Videography Page! See sparks fly captured at over 6,800 frames per second! Normally we see fireworks in the warm summer night sky as objects of unquestionable beauty and fascination - certainly an art form all its own. Now, in the interest of overall safety awareness, pyro science and the continuing effort to design state-of-the-art firing systems, Starflight Electronics is proud to present these videos which show pyrotechnic events as you've never seen them before - Captured with an ultra high speed video camera we can now see details that are just too fast to really see with the unaided eye. See the launching of a commercial display fireworks shell, an electric match head bursting into flame, and the amount of heat generated by a malfunctioning fireworks shell. These videos reveal another form of the beauty and incredible energy of pyrotechnics - and why all responsible pyro crew personnel treat these devices with the utmost care and respect. With many thanks for a generous demonstration of the fantastic Redlake model HS-4 high speed video camera (by Jason McGinnis of PSI Solutions, Inc.) Starflight Electronics is proud to offer these interesting pyrotechnic events captured at 5,000 and 6,820 frames per second. Normal film and video cameras operate at 24 and 30 frames per second, so we are "slowing down time" by a factor of over 200 times in these videos. Capturing these videos is not an easy undertaking, but with materials, ideas and support from Entertainment Fireworks, Inc. (especially Ken Julian, Terri & Gary Schuette, and the rest of the gang at EFI), and with some generous advice on camera housings from John Petrash of Specialty Fireworks in Gleason, WI, we were able to come up with a design for capturing some fantastic video images of what happens "nearly instantly" to the human eye. This is the result of literally days of labor getting the equipment ready, planning the shots for safety of camera and crew, and then waiting for a break in the rainy weather here in Washington State. These shots were taken mostly on March 22, 2005. This is only the first round of high-speed photography. Later on we hope to add to this collection with a more refined approach to the test setup, so we can see even greater details. For these test video shots, the camera was placed in a heavy protective housing specially designed to protect the camera and the lens, and yet still provide a clear view of the action. Based on these tests, the protective camera box can be redesigned for the next batch of videos. NOTE: In order to view these videos, your computer must be able to playback Microsoft "wmv" video files. You can get the Windows Media Player for free here. And not the version you downloaded way back in 1997, either. Try to get a fairly recent version - either version 9 or 10 should work OK. And no, there isn't any sound with these, so turn the volume back down. And yes, there is a version of Windows Media Player for Apple users as well. For Linux users there are many player options, "vlc" being one route, but you'll know what works best on your system. For best performance we recommend that you RIGHT-CLICK the links below and "Save As..." to your computer first, and then play the file directly from your computer's hard drive. NOTE TO THOSE WITH A LOW-SPEED (TELEPHONE MODEM) CONNECTION: These videos are 4 to 10MB in size, so downloading is going to take some time. If you're limited on download speed probably the best videos to download are #1, #8, #13. If you have kids get #14, which will put everything in perspective for them. COPYRIGHT NOTICE ( (c) 2005 by Starflight Electronics, all rights reserved. No reproduction permitted by any means without written permission, except for personal, non-commercial use) These images are provided free for your personal viewing, however we ask that you please DO NOT post these files onto other websites, and please leave the credits intact and unchanged. Posting a link to this page is perfectly fine! Thank You! NOTE: In the videos below, a time index is shown in the upper left hand corner of the video. This indicates the time from when the electric match was fired to initiate the event. In other words, at time 0, the current starts flowing into the electric match. CLICK ON ANY IMAGE TO ENLARGE VIDEO ARE COMPRESSED FOR WEB, SO THERE IS SOME LOSS OF CLARITY Section One 1.
2.
3.
Section Two 4.
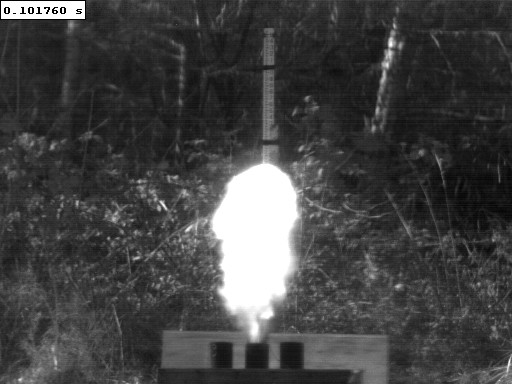
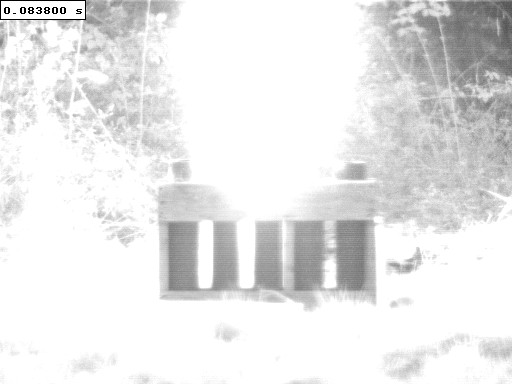
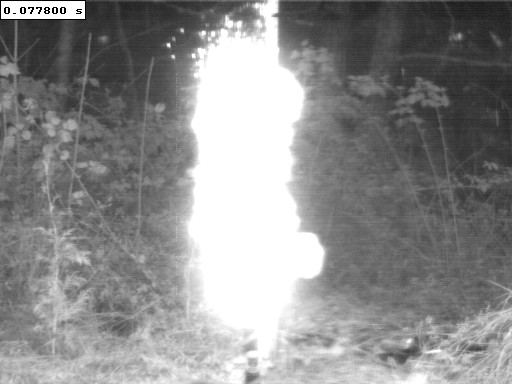
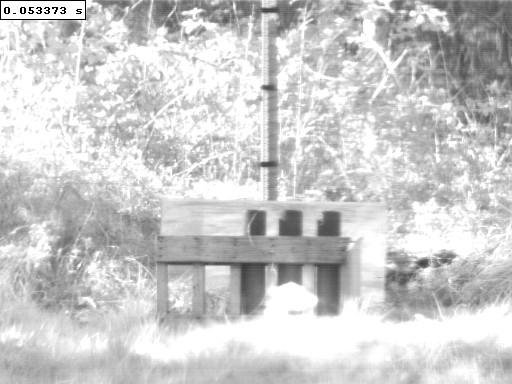
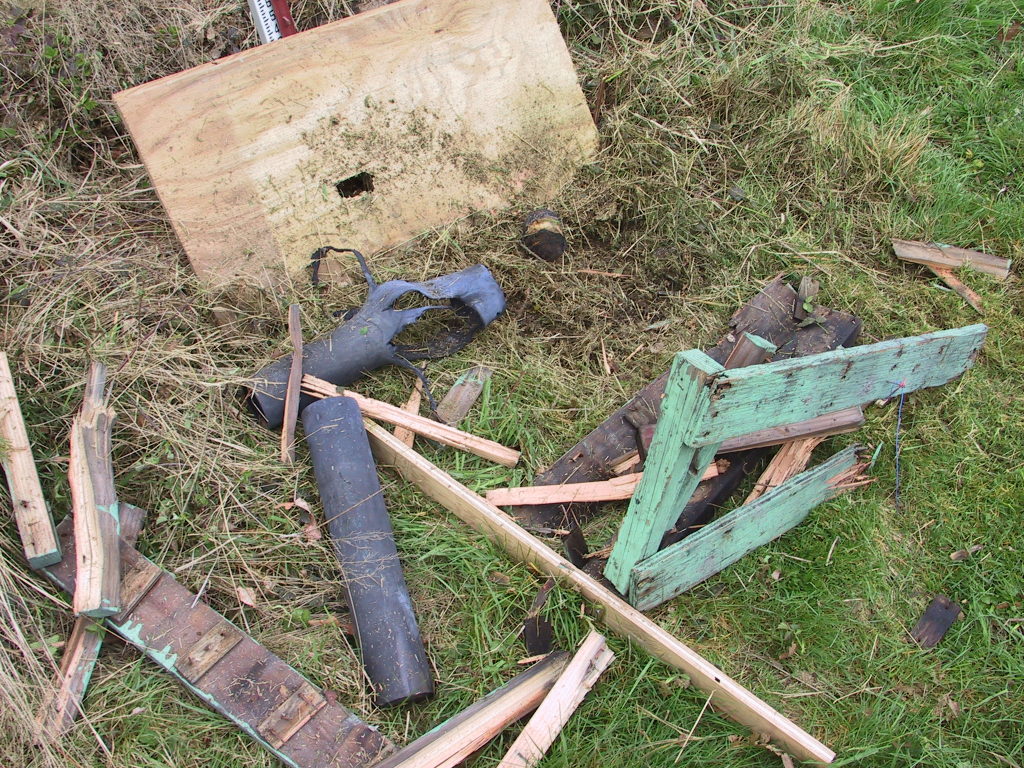
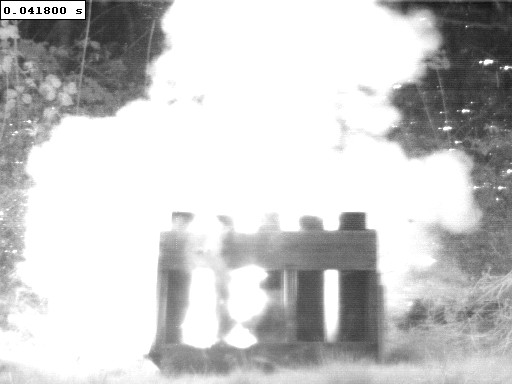
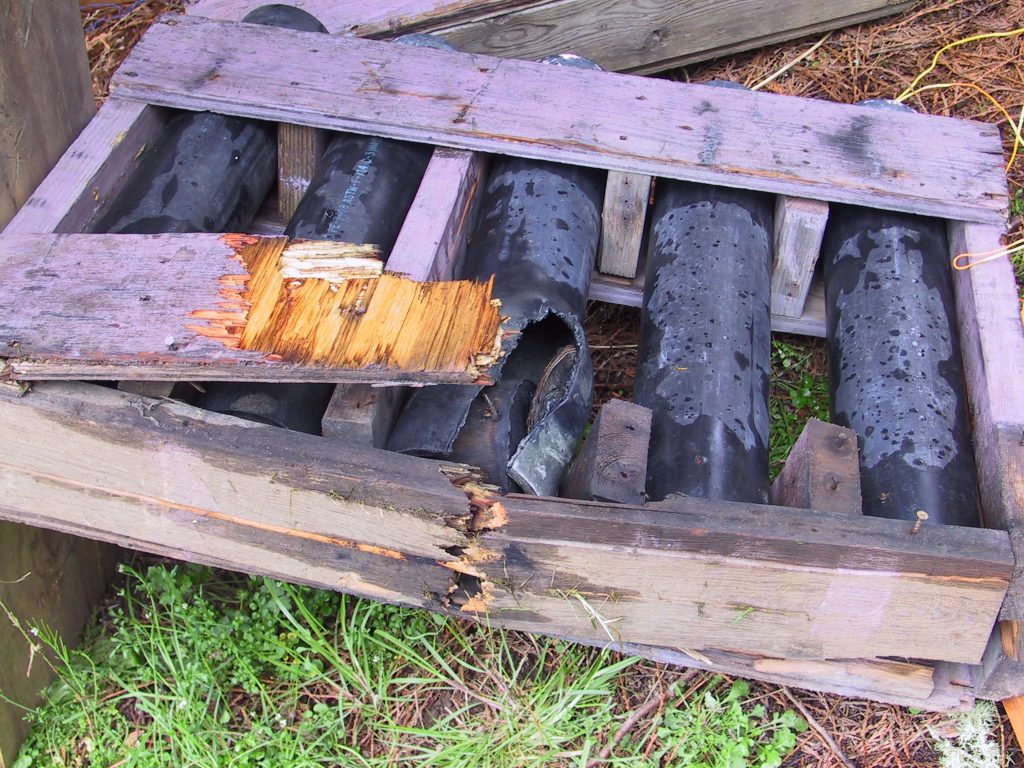
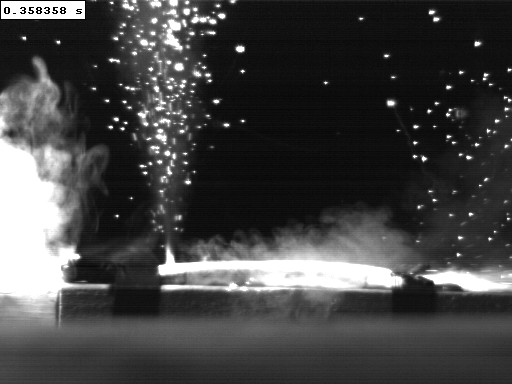
NOTE: Salutes are the shells that you'll see at a fireworks show that ascend and then just explode with that wonderful chest-thumping ka-BOOM and leave your eyes blinking with that bright flash of light. These shells are typically filled with "flash powder" which "detonates" very, very fast. This happens much more quickly than regular "Black Powder" - which doesn't detonate but will "deflagrate" instead. Almost all other fireworks shells will burst open using black powder, and therefore the "boom" you hear is much less loud. Rack and Mortar "After" Photos:
Note: The black spot on the 1/2" plywood backdrop board is a thru-hole formed during this blast. A small piece of the mortar broke off and was sent straight through the plywood at a distance of about 20" from the mortar. Yes, sometimes even HDPE mortars come apart.
5.
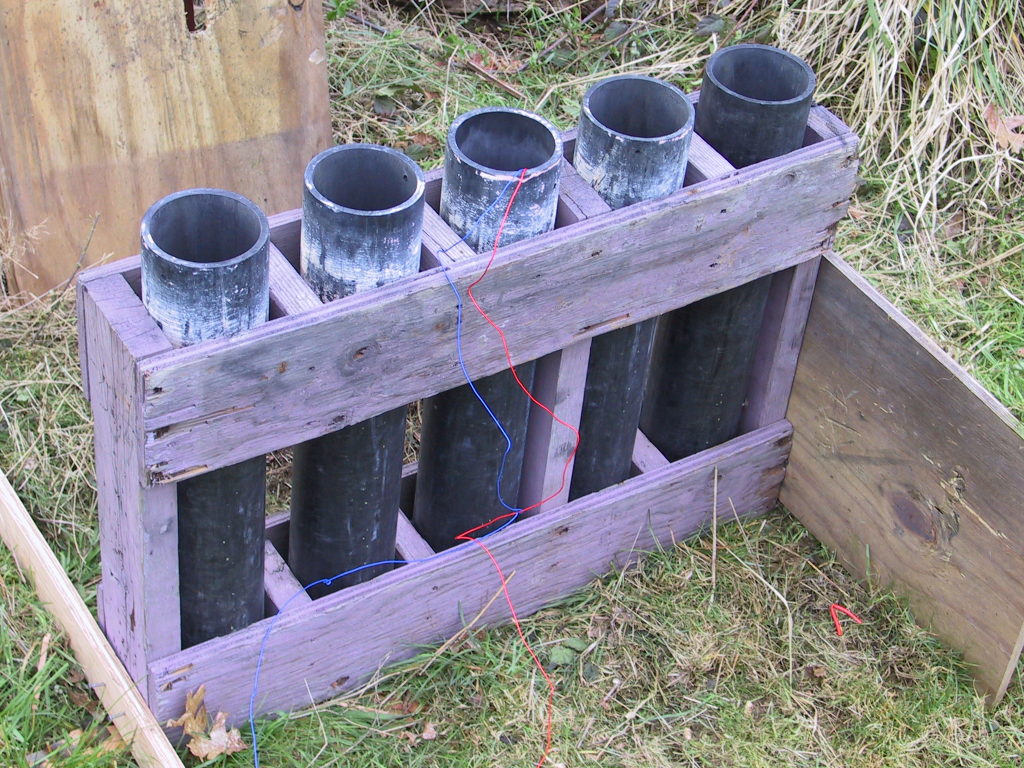
4Inch Rack Before Photo :
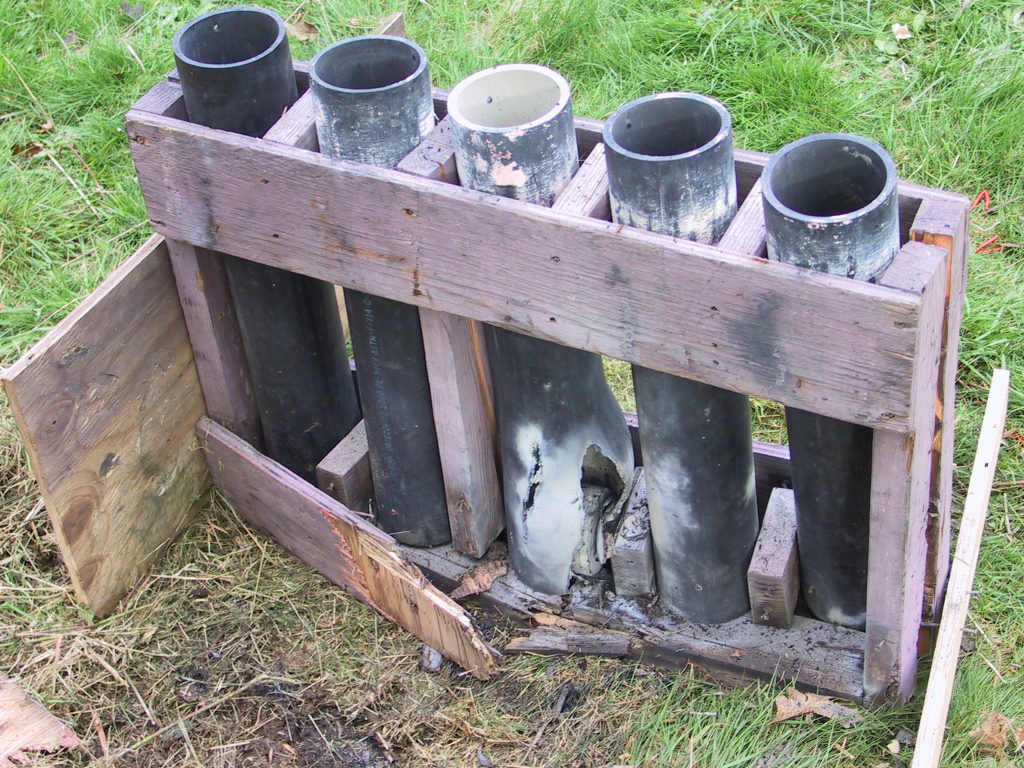
4Inch Rack After Photos:
Section Three 6.
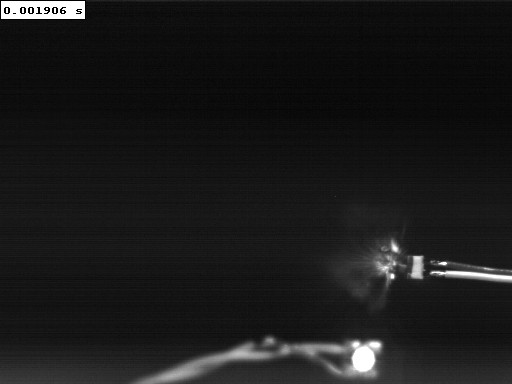
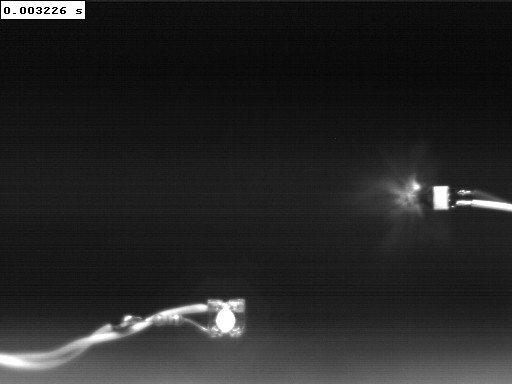
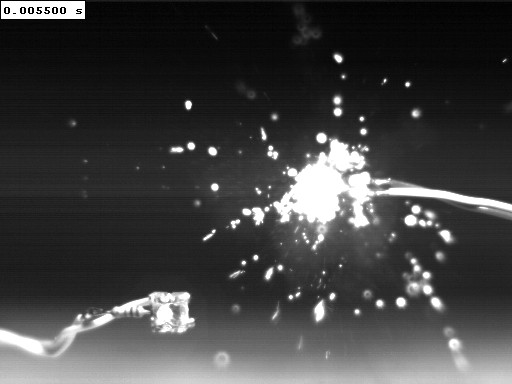
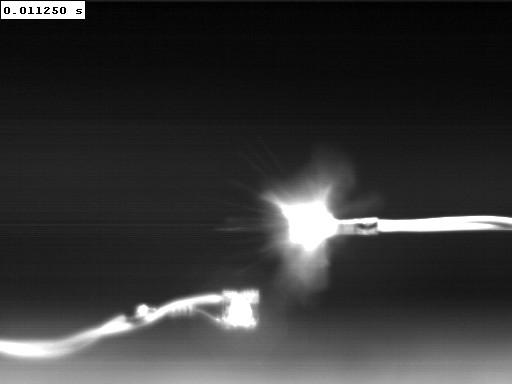
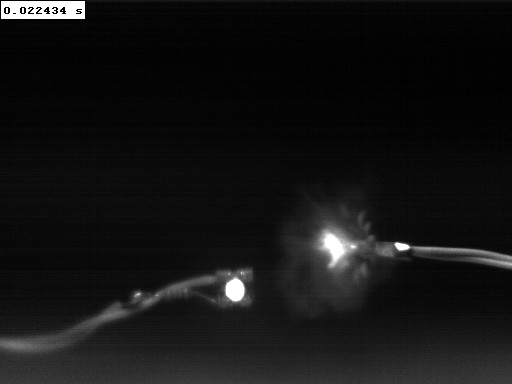
NOTE: In some of these videos you'll see part of the match head fall away as it is ignited. This is normally not a problem since the ematch is almost always placed tightly inside the quickmatch fuse, which tends to keep the burning composition all held together. ANOTHER NOTE: In these videos you'll see an LED light that glows at the beginning of the video and then goes out. This LED is wired in series with the ematch, so we can measure not only how long it takes the ematch to ignite, but how long it takes for the nichrome igniter wire to burn out. YET ANOTHER NOTE: For you technical pyro types, these images were all shot with 24 volts DC, dropped through a 30 Ohm resistor to simulate a wire run or other ematches wired into a series circuit (measured current was .83 amps during the firing pulse). With the exception of video number 6, which was shot with a 20 ohm resistor in series (measure current 1.18 amps), and you'll see that it ignites a little faster than the rest. Otherwise all the ematches shown were fired from an identical firing circuit, with a bit more than the minimum recommended firing current applied for series circuit firing.
7.
8.
NOTE: In the videos above, notice how the ematch ignites very quickly and reliably. The videos below show what happens when an ematch manufacturer isn't assembling their matches correctly.
9.
10.
Section Four 11.
Quickmatch without the casing applied is known as "Black Match" which burns at perhaps a few inches per second. But when you apply the paper casing, or "pipe" you get a situation where the hot gases are compressed around the black powder as it burns, increasing the burn rate into hundreds of feet per second. In these videos you can actually see the quickmatch casing pressurize, and you can see the speed of the flame increase faster and faster until the casing bursts. The quickmatch has completed its job by the time the casing bursts, though. What you're looking at in these videos is a 6" long piece of quickmatch clamped down with two pieces of black tape. The black tape is 4" apart - you have to anchor quickmatch down or it will propel itself around like an out-of-control water hose. There is an ematch folded into the left end of the quickmatch to start things off. The white dot you see early on in the video is our friend the LED, which is again wired up to show that were are applying current to the ematch - and then exactly when the ematch burns out. 12.
13.
NOTE: Yes, you CAN see the sparks and flame traveling rapidly through the paper casing / covering. That's because the camera is very sensitive to infra-red light (IR & "heat"), and paper is fairly transparent to IR. So we are actually able to "see into" the quickmatch piping as the fire shoots through from one end to the other. Neat-o!
Section Five 14.
Comments? Constructive Thoughts? Ideas for the next shot setups? email me at: infosfe@starflightinc.com I can't promise a response to every email, but we try to get to them all. On the next "shot list" we'll be turning the mortars sideways to the camera to get an idea of the lateral force of an explosion due to a shell malfunction. In addition, we're going for a shot of the shell in flight - for that we'll have the camera aimed at a section 12 to 15 feet above the mortar to get above the muzzle blast. Additionally, we'll be experimenting with stronger InfraRed filters to get a better shot of the flames without overloading the rest of the shot, as well as the use of fast welder's glass to snare a shot of that salute in mid-detonation. Enjoy! -John Anderson Again, credits, references, and a heartfelt thanks go to: Redlake HS-4 High Speed Video Camera, Redlake, San Diego, CA (www.redlake.com)
|